Easy Drawing Step By Step Rose : How To Draw A Rose Step By Step Guide For Beginners Craft Mart / Neither the direction nor the number.
byAdmin•
0
Easy Drawing Step By Step Rose : How To Draw A Rose Step By Step Guide For Beginners Craft Mart / Neither the direction nor the number.. How to draw a rose step by step. Follow along to learn how to draw this realistic rose easy, step by step. Draw another, shorter line overlapping the end of the first. Just draw a small bean like shape in the middle of the page as it is the centre of the rose. The oval need not be perfect.
By continuing your work, reshape step 1 again as there is needed to draw little curves covering the rose body. Lay out your rose in basic shapes. Rose step by step drawing the tutorial can be split into three major parts which are the shape sketch, the outline drawing and the shading. Keep your movements fluid and loose throughout this process. Use a long curved line.
How To Draw A Rose Step By Step Guide For Beginners Craft Mart from craft-mart.com Begin by sketching a big u. Draw a smaller arc within the open oval, with its ends meeting the left and bottom sides of the oval. This beautiful full bodied easy rose drawing can be drawn with just a few simple and repetitive lines, and once the magic formula for drawing a rose has been revealed, beginners and kids will be creating full bouquets of beautiful roses in no time! Rose flower in full bloom. Draw a second vertical line, parallel to the first. The final guide involves a rose with a stem. Draw an oblong along the top edge of that circle with the upper curve merging with the upper curve of the circle to show where the rim of the petals will be; Then curve the top end of this line to the right and down so that it meets.
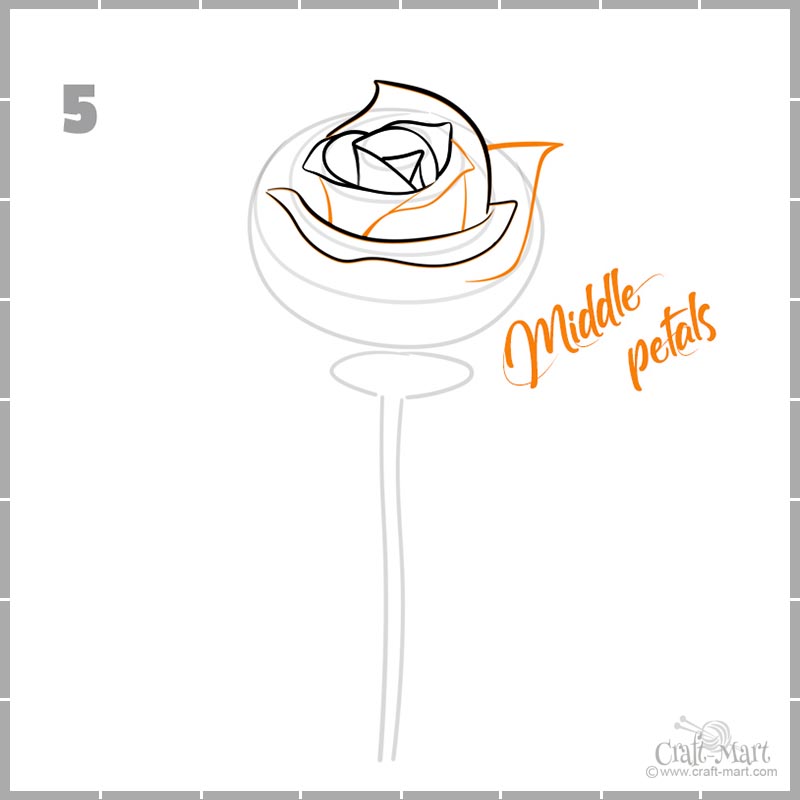
These wavy lines represent the tips of the central petals sticking out in the middle.
This would make a beautiful drawing on the front of a valentines day card. Draw a smaller arc within the open oval, with its ends meeting the left and bottom sides of the oval. Note the bulges of the zygomatic area beneath the eyes. This is an easy step by step tutorial on how to draw a beautiful rose! These flowers are actually just a few simple shapes, and you will have roses as a drawing in no time. Rose flower in full bloom. I have made this how to draw a rose step by step tutorial for kids and beginners. By continuing your work, reshape step 1 again as there is needed to draw little curves covering the rose body. It is a perfect fit for beginners and makes flower drawing easy. Connect each end of the pale using two short, curved lines that meet in a blunt point. As roses are fairly difficult to draw, if you find yourself struggling with the first two parts you may want to simply practice drawing those before moving on to the shading. Start by drawing a small curved line for the first petal in the middle of the rose flower. You must take care of its size and posture.
Starting from the center and working your way out, lay in the center of the rose, then a few small petals next to either side. Connect each end of the pale using two short, curved lines that meet in a blunt point. Rose step by step drawing the tutorial can be split into three major parts which are the shape sketch, the outline drawing and the shading. For the next petal, first draw a diagonal line that closes the bottom end of the first petal. Draw another, shorter line overlapping the end of the first.
Rose Pencil Drawing Step By Step Novocom Top from i2.wp.com Start by drawing an open sided oval in the center of your page. Begin by sketching a big u. Use a long curved line. I usually start with a circle, and then another smaller circle near the top of the first. Have fun learning with drawing lessons for young and old. You must take care of its size and posture. As roses are fairly difficult to draw, if you find yourself struggling with the first two parts you may want to simply practice drawing those before moving on to the shading. This is an easy step by step tutorial on how to draw a beautiful rose!
Draw petals around the circle.
This is an easy step by step tutorial on how to draw a beautiful rose! Just draw a small bean like shape in the middle of the page as it is the centre of the rose. If you find it difficult, then you are in the right place. I usually start with a circle, and then another smaller circle near the top of the first. The oval need not be perfect. Lay out your rose in basic shapes. A dull pencil works best, as it glides across the paper more easily when sketching out basic shapes. These lines form the upright pale of the cross. Draw a second vertical line, parallel to the first. Neither the direction nor the number. Dieses & viele weitere englische bücher versandkostenfrei bei thalia bestellen! Roses are such beautiful flowers, and with this how to draw a rose step by step tutorial makes it easy. This shows the angle that you.
Step 1 first step is very easy. If you find it difficult, then you are in the right place. Regardless of your shape, the rose is going to look great. Add two more shapes at the left and right to get a perfect rose drawing. It is a good idea to start with a light pencil such as a 2h or 3h.
Pin By Kitze Katze On Tecnica De Pintura Flower Drawing Easy Flower Drawings Roses Drawing from i.pinimg.com Now make a basic shape for its petals. It is a good idea to start with a light pencil such as a 2h or 3h. Step 1 — what pencil to choose & a light touch. These flowers are actually just a few simple shapes, and you will have roses as a drawing in no time. Neither the direction nor the number. Drawing a single rose or dozen of roses is quite easy. Roses are such beautiful flowers, and with this how to draw a rose step by step tutorial makes it easy. Rose drawing easy step by step tutorial/ rose pencil sketch lesson.
I will show you how to draw the rose in easy to follow steps.
How to draw roses opening in full bloom step by step drawing tutorial. Draw a second vertical line, parallel to the first. Use a long curved line. Draw a couple a wavy shapes. ️ supplies you might love (amazon. Draw a straight, vertical line through the center of the pale. Connect each end of the pale using two short, curved lines that meet in a blunt point. Step 1 — what pencil to choose & a light touch. Draw the oval as if the upper right quarter has been erased. As roses are fairly difficult to draw, if you find yourself struggling with the first two parts you may want to simply practice drawing those before moving on to the shading. Begin by sketching the braincase and face of the skull. Begin by sketching a big u. Draw the area around the eyes, the orbital plate.
In each, petals are added around the initial shape easy drawing step by step. For the next petal, first draw a diagonal line that closes the bottom end of the first petal.